How to: Lower down AWS OpenTelemetry Lambda Collector overhead

Intro
Running OpenTelemetry Collector using a layer on AWS Lambda might add significant overhead to the execution time. In our case, this was not a big deal as in most cases we use lambdas as part of event-driven architectures. Apart from that, it’s an issue in the case of a cold start, which according to AWS is affecting up to 1% of calls.
However, for many workloads, this could be a big problem. So let’s see what we can do to make it better.
AWS Lambda Layer Extension
AWS Lambda can be instrumented using the AWS OpenTelemetry lambda layer (GitHub link).
By default, the AWS OTEL lambda layer sends telemetries after every execution. Does it make sense? It depends on your requirements. In case you need your telemetries immediately — then yes.
There is another option — you can trade off telemetry collection delay for lower execution overhead.
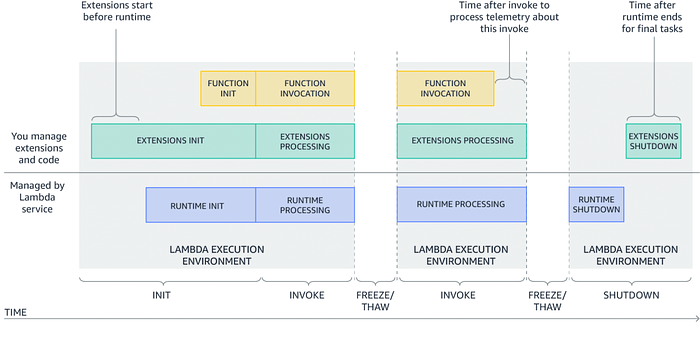
With some changes, a layer could use the AWS Lambda Extensions API (which is an API to hook into the AWS Lambda execution lifecycle).

The extension starts before the lambda runtime and shuts down after some idle time. Since we have a trigger for shutting down the runtime, maybe we could only send telemetry then? Theoretically yes, but the runtime will only shut down after it has been idle for some time. When will that happen? Who knows. It depends on your lambda setup and the amount of invocations.
To solve this problem, you need to use a new type of processor that has been created. It’s called a decouple processor.
Decouple processor
The decouple processor is aware of the lambda lifecycle and separates collecting data in OTEL receivers from exporting data. Since it is aware of lambda lifecycle it can flush all remaining data at the end.
It means that your lambda won’t be blocked after invocation and the layer will send telemetries in the background without blocking lambda execution. What is more, it could send it less frequently in bigger batches using a batch processor.
It’s still unstable, unfortunately as it’s in the development stage, but I wanted to check if it looks promising.
Decoupled configuration
receivers:
  otlp:
    protocols:
      grpc:
        endpoint: localhost:4317
      http:
        endpoint: localhost:4318
exporters:
  logging:
    verbosity: basic
  otlp:
    endpoint: ${CollectorEndpoint}
    headers:
      api-key: {{resolve:secretsmanager:NewRelic-OTEL:SecretString}}
processors:
  # https://github.com/open-telemetry/opentelemetry-lambda/blob/main/collector/README.md
  # https://github.com/open-telemetry/opentelemetry-lambda/tree/main/collector/processor/decoupleprocessor
  decouple:
  batch:
    timeout: 1m
service:
  pipelines:
    traces:
      receivers: [otlp]
      processors: [batch, decouple]
      exporters: [otlp]
    metrics:
      receivers: [otlp]
      processors: [batch, decouple]
      exporters: [otlp]
Performance tests
Tests that I have run are reproducible and they are super simple tests using k6 and invoking lambdas using function URLs.
There are 3 series in each test:
- Baseline (no OTEL layer at all)
- Lambda using OTEL collector layer
- Lambda using OTEL collector layer with decouple processor
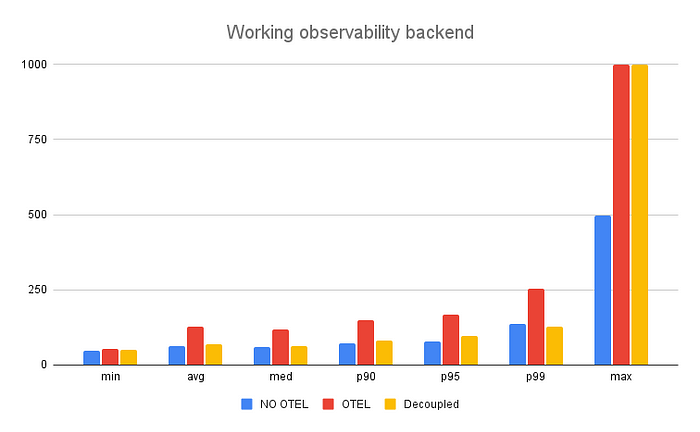
Scenario 1: Correct URL
Based on the results below, we can see that there is a much lower overhead for lambda using the decouple processor than the one that does not. This was expected as it did not wait for telemetry to be sent.

Scenario 2: Bad exporter URL
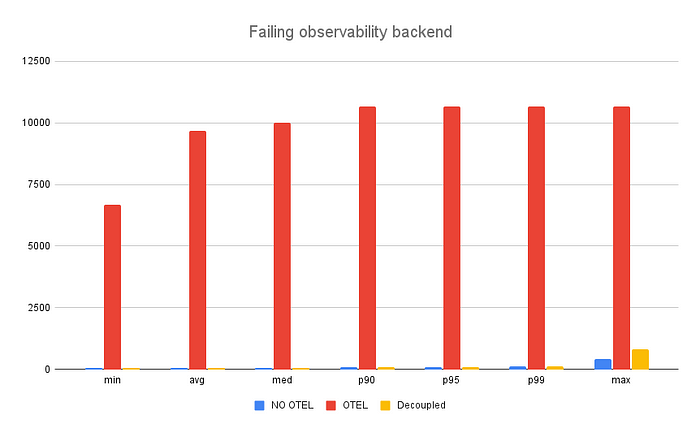
To check how good the decouple processor is, I decided to run a test using the wrong URL in the collector configuration to simulate a failure/extremely slow working backend behind the exporter.
Based on the result below, you can see that the decouple processor works much better, especially in the case of a slow/failing backend behind the exporter.

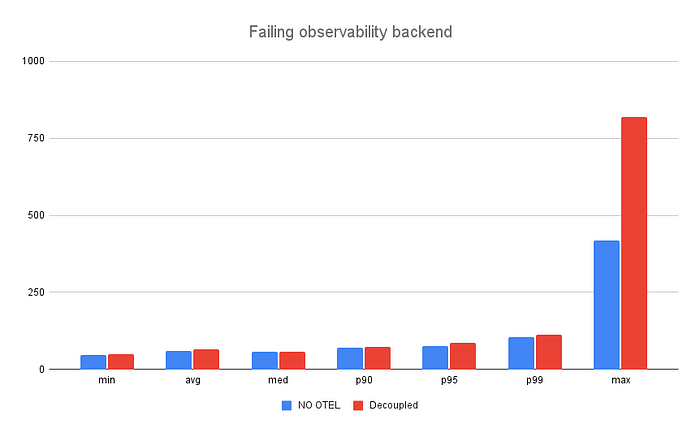
To see it without the outstanding OTEL series take a look at the results below:

Summary
In case you have missed it,decouple processor is still in the development phase, so it’s not ready yet. It looks very promising for the future. If you want to play with it, you can use the lambda layer below.
!Sub arn:aws:lambda:${AWS::Region}:184161586896:layer:opentelemetry-collector-arm64-0_5_0:1The tests I did were based on the sample code in the repo you can find here. There’s nothing fancy and it’s based on the configuration in my account, but please have a look.
I hope you liked the post and learned something new. Cheers!

